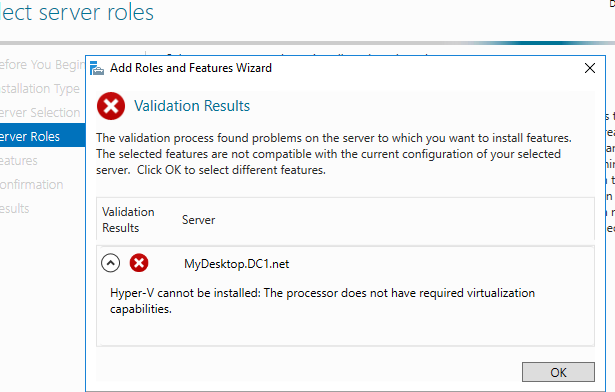
Recently, I’ve decided to understand Windows Server Capabilities, Roles and Features by setting up my own Home Lab. I’ve interest to know more about clustering and migrations techniques, so I was to install Hyper-V role on my guest Windows Server 2019, but failed with this prompted message:
Host specs:
- CPU: amd ryzen 5 3600
- OS: arch Linux x86_64, KDE Desktop Environment
- kernel version: 5.10.84-1-lts
- Virtualization: enabled in BIOS
- Hypervisior: KVM/QEMU
Solution
Firstly, I checked if nested virtualization is supported on my CPU, in my case it’s amd.
$ cat /sys/module/kvm_amd/parameters/nested
1
If output is “Y” or “1”, then it’s supported.
So, I’ve enabled this feature by:
- Shuting down all running VMs and unload the KVM_probe module:
$ sudo modprobe -r kvm_amd - Activating the nesting feature.
$ sudo modprobe kvm_amd nested=1 - Enabling it permanently by adding the following line into /etc/modprobe.d/kvm.conf file:
options kvm_amd nested=1
Note: For intel CPUs replace any kvm_amd word by kvm_intel.
I’ve rebooted the host, and tried to install Hyper-V on my guest machine but failed again.
Apparently, it seems an issue with cpu model configuration and features related to my guest VM. I’ve check qemu docs for cpu model configuration, and figured out that there’re three ways to configure CPU models with QEMU/KVM:
- Host Passthrough This passes the host CPU model features, model, stepping, exactly to the guest.
- Named Model As listed, QEMU comes with list of predefined named cpu models, that refer to specific generations of hardware release by the famous vendors: AMD or intel.
- Host Model It’s supported by libvirt virtualization management tool that provides a great tools and features to easily build, configure and manage Virtual Machines.
This third method uses the “Named Model”, automatically picking a CPU model that is similar the host CPU, and then adding extra features to emulate the bare-metal CPU of the host. Unfortunately, it doesn’t guarantee an approximate level of matching host CPU.
For more info about libvirt check resources.
As result, I decided to open the XML config file my running VM (win server 2019) and check CPU model configuration. Surprisingly, it was configured to the non-accurate third method “Host-model”, as listed below:
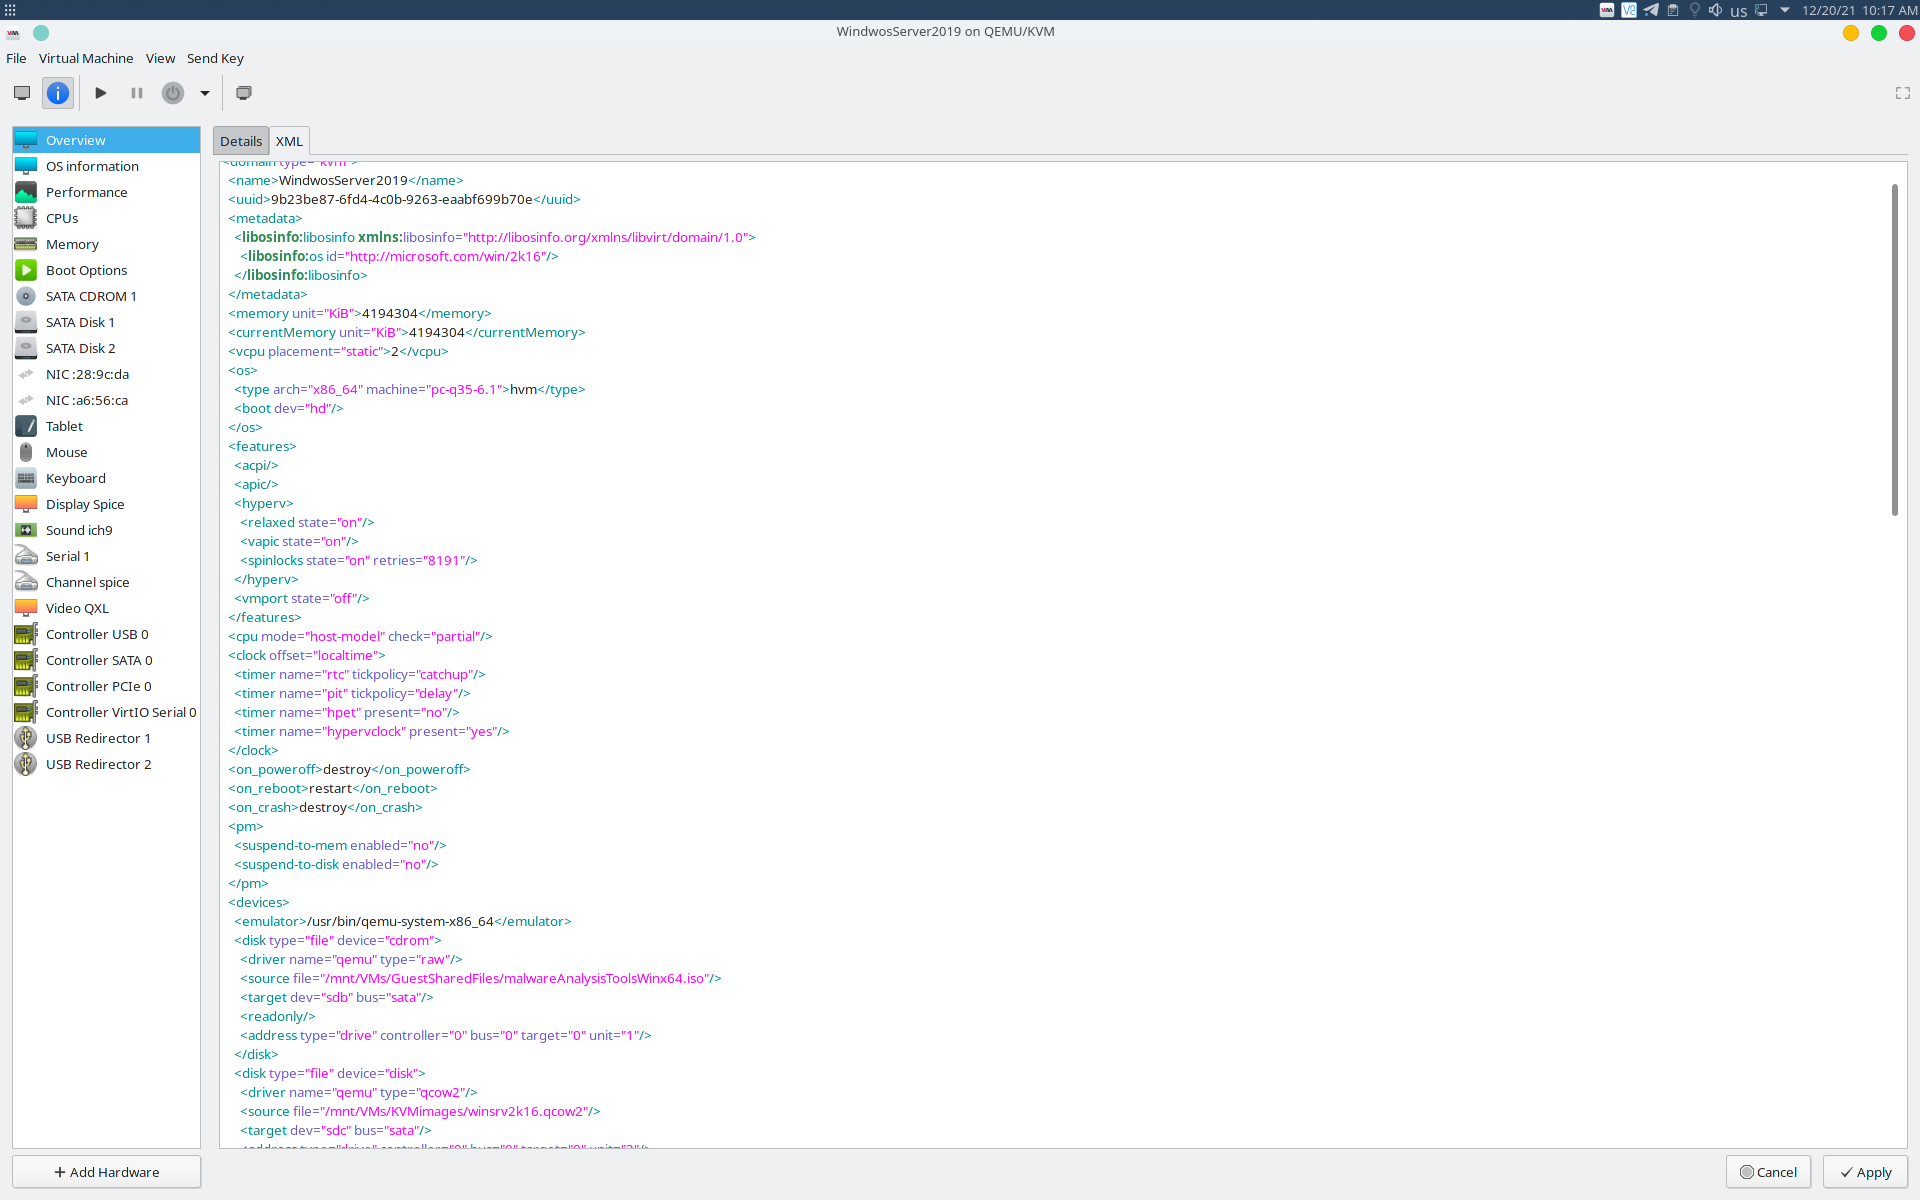
At first, I’ve tinkered with some xml attributes by choosing the trial and error method, but didn’t work as machine didn’t boot or prompted the famous windows failure blue screen.
Eventually, after changing the cpu mode to “host-passthrough” it worked perfectly, and I was able install Hyper-V role. Don’t change parameters, just try modifying the cpu mode only to avoid any issues with features support for example.

Thanks for reading, I hope you find this helpful.
Resources:
- https://docs.fedoraproject.org/en-US/quick-docs/using-nested-virtualization-in-kvm/
- https://qemu.readthedocs.io/en/latest/system/qemu-cpu-models.html
- https://en.wikipedia.org/wiki/Kernel-based_Virtual_Machine
- https://libvirt.org/
- https://en.wikipedia.org/wiki/Libvirt
- https://computingforgeeks.com/install-and-configure-hyper-v-on-windows-server/